All posts by z yy

External Hard Drive Not Recognized

External Hard Drive Not Recognized

Your PC refuses to recognize your external hard drive? What should you do if your external hard drive not showing Windows 10?


Video Tutorial – Hard Drove not recognized

Don’t worry if you cannot find your external hard drive in Windows Explorer. Now, you can try the following steps to fix the external hard drive not recognized issue.


How to Fix External Hard Drive Not Recognized


Solution 1. Check USB Port and Update Drivers

The first thing you can do when encounter the “external HDD not detected in Windows 10” issue is to check USB port and update drivers.
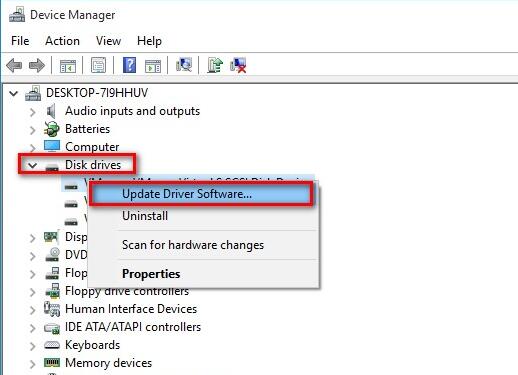
update drive software

Solution 2. Unhide Hard Drive

As we know, some users want to hide their hard drive to prevent someone from seeing its data. As a result, the hard drive will not show up in File Explorer. In this case, you need to unhide external hard drive to solve this issue.


Solution 3. Initialize Disk

If you connect a new external hard drive to PC, you need to initialize it. Otherwise, your PC cannot recognize it.

initialise disk

Open Disk Management, and then select the external hard drive and then choose Initialise Disk. After that, choose partition style (MBR, or GPT). Then, follow the wizard to complete this task.


Top Recommendation: Here, you might be interested in this post: MBR VS GPT (Focus on Difference and How to Convert Safely)


Solution 4. Partition Hard Drive

If you meet the external HDD not detected issue, you should open Disk Management to check its status. Sometimes, it shows unallocated space. Now, you have two options to solve this issue.

unallocated

  1. You can directly create new partition on the unallocated hard drive space if you don’t care about its data.


  1. You can turn to a professional partition recovery tool to recover lost partition as well as data from the unallocated space. For more details, you can read this post: Partition Recovery.


Solution 5. Change Drive Letter

Hard drive cannot be recognized if its drive letter is missing! This is known to all. Therefore, if you encounter the external hard drive not recognized issue, you need to check its drive letter. Now, you can read this post “Several Ways to Get the Missing Drive Letters Back in Windows” to learn how to solve this issue.

change drive letter

Now, it’s your time to fix the external hard drive not recognized issue. Should you have any ways to fix the external HDD not detected problem, please share it with us via support@minitool.com. Thanks!


Preparing Automatic Repair

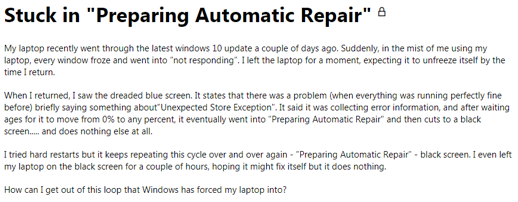
Stuck in “Preparing Automatic Repair” or diagnosing your PC loop? Have you ever encountered the same issue?


preparing automatic repair


If your PC has stuck on a screen with a message saying “Preparing Automatic Repair” or “diagnosing your PC”, don’t worry and you can read this post to find how to solve this issue.


Windows 8 and Windows 10 offers the “Automatic Repair” recovery feature which can help to repair Windows when operating system fails to boot. However, sometimes, Windows automatic repair not working or PC stuck in “preparing automatic repair”.

Now, you might be wondering:
“What should we do if Windows has stuck on a screen with a message saying “Preparing Automatic Repair” or “diagnosing your PC?”


Video Tutorial

Try the following solutions to fix the preparing automatic repair loop.


Solution 1. Perform a hard reboot
If you encounter the “Preparing Automatic Repair” or “Diagnosing your PC” error, the first thing you can do is to perform a hard reboot. If it cannot help you, you can try booting into safe mode.


Solution 2. Boot into safe mode
Stuck in Windows Automatic Repair loop! Try booting into safe mode to fix this issue.
The steps are:

Connect Windows bootable installation disk into your PC with “Diagnosing your PC” error.
Boot your PC from this installation disk, and then select language preferences, and click Repair your computer.
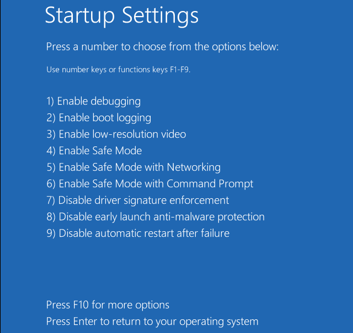
Select Troubleshoot > Advanced options > Startup Settings > Restart.
Press the F4 key to boot into minimal Safe Mode.


boo into safe mode


Solution 3. Perform a startup repair
According to users’ feedback, we find some users solved the laptop is stuck on Preparing Automatic Repair during startup issue by performing a Startup Repair.

Boot PC from the Windows bootable drive to your computer.

Select your language preferences, and click on Next.

Click on Repair your computer.

Select Troubleshoot.
Select Advanced Options.
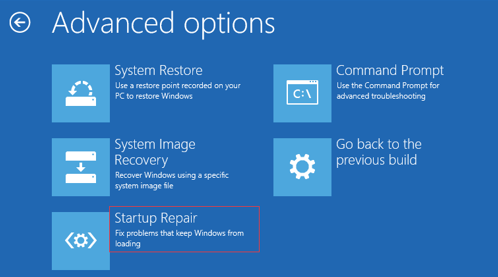
Select Startup Repair.

startup reapair


Solution 4. Rebuild BCD
As we know, once the boot files are missing or corrupted, your laptop will stick in Preparing Automatic Repair. In this case, you can try the following steps to rebuild BCD.

Boot your PC from the Windows bootable installation disk.

Select your language preferences, and click on Next button to continue.

Click on Repair your computer.

Click on Troubleshoot > Command Prompt.

Type bootrec /fixmbr and press Enter.
Type bootrec /fixboot and press Enter
Type bootrec /scanos and press Enter
Type bootrec /rebuildbcd and press Enter.

rebuild bcd

Type exit and press Enter. After that, restart PC.


Solution 5. Reinstall Windows
Here, if the above solutions cannot work, you can try the last solution – restoring operating system.

Warning: before reinstalling Windows, you need to transfer all data on your hard drive for Windows reinstallation will write new data. Here, to recover data, you can try using MiniTool Power Data Recovery. More details can be found in How to Recover Data When PC Won’t Boot.

USB Drive Cannot Be Opened

Today, many users will use USB drive to store some files or to transfer files. However, according to users feedback, we find many users have encountered a thorny issue: their USB drive cannot be opened. Are you one of them?

If you cannot open your USB drive, you cannot access its data. What should we do if the data saved in the USB drive are very important for us? Now, I guess you might be wondering: “how to open USB drive to access its data?”

Fortunately, today, we are going to show you how to effectively solve the USB drive cannot be opened issue.


Case 1. USB drive file system is RAW
Sometimes, when you try to access your USB drive, you will be asked to format it before you can use it. Have you ever encountered this issue? What should you do in this case?

Now, if you encounter the RAW file system, your USB cannot be opened. In this case, you can try the following 2 steps to fix this issue.

Step 1. Recover lost data from the USB drive whose file system is RAW.
Step 2. Format your RAW USB drive to NTFS.

Video Tutorial
Click the play button to learn how to convert RAW to NTFS to fix the USB drive cannot be opened issue.


Case 2. The Parameter Is Incorrect
Some users received the following error message when trying to access their USB drive:
Drive is not accessible. The parameter is incorrect.

As we know, if you pull out USB drive without ejecting, or if the USB port is the bridge which connects the removable drive like USB flash drive to computer, or if there are some bad sectors on your USB drive, you cannot open your USB drive and then you might encounter “The parameter is incorrect” error. Now, what should you do?

First of all, you need to recover lost data from the USB drive whose parameter is incorrect. Next, you can try the following 2 solutions to solve this issue:
Solution 1. Format your USB drive.
Open Windows Explorer, right-click USB drive, choose Format, and then specify file system as well as click Quick format, and finally click Start button to format it.
Solution 2. Check and repair some errors
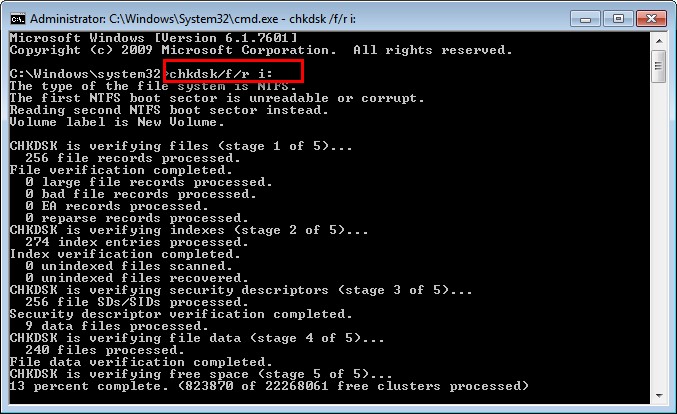
Open diskpart, and then type command line “chkdsk /f/r X:” (X is the drive letter of the inaccessible partition) and hit Enter key.
Finally, type exit and press Enter to leave it.

check and repair errors


Here, we listed 2 cases where we cannot open USB drive. If you want to know more details about USB drive cannot be opened issue, you can read this post: How Do I Solve USB Drive Cannot be Opened in Windows 7/8/10.

I/O Device Error

I/O Device Error

The request could not be performed because of an I/O device error.

Have you ever encountered the above error? Do you know how to solve the I/O device error?


What Is I/O Device

I/O device (input/output device) is any hardware that is capable of sending data (output) to a computer and receiving data from a computer (input). A human operator or other systems use I/O device to communicate with a computer.


However, I/O device error often happens and it can occur on external hard drive, SD card, USB flash drive, and other different hardware device. I/O device error can be caused by various subjective or objective reasons. Now, the big question is how to fix the I/O device error?


Top Recommendation

If your hard drive contains massive important data, you had better recover lost data from the drive with I/O device error before fixing this error. Otherwise, the lost data could be overwritten by new data because of mistaken operation. Thus, there is no way to recover lost data.


Now, if you don’t know how to recover data from drive with I/O device error, you can watch the following video to learn how to restore lost data.


How to Fix I/O Device Error

If you encountered the I/O device error, you can try the following solutions to fix this issue.


  1. Update driver

As we know, if you are using the old drivers, you might encounter “The request could not be performed because of an I/O device error” issue. Now, you just need to update drivers by the following steps to fix this issue.


Press Windows + R, type “devmgmt.msc” into the Run dialog, and press OK.


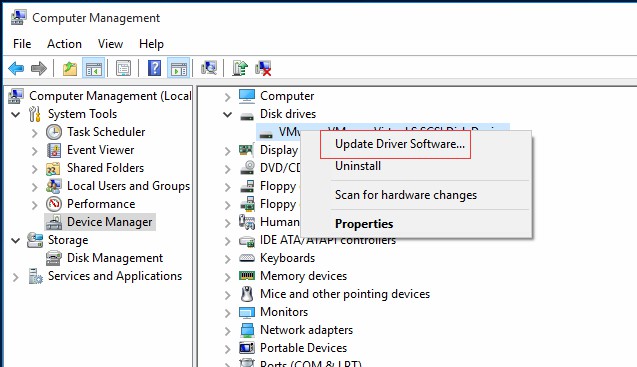
Expand Disk drives. Right-click the external hard drive and choose Update Driver Software…

update driver


  1. Change driver letter

According to users feedback, we find some users encountered “The request could not be performed because of an I/O device error” issue because of their driver letter is mistaken. In this case, they only need to change drive letter.


The steps are:

Open disk management.

Right-click the target drive, and then choose Change Drive Letter and Paths…

change drive letter

Click Add and then choose a letter for the drive and click OK.


  1. Check and repair errors

Once your hard drive has some bad sectors, you will encounter some errors like “The request could not be performed because of an I/O device error”. In this case, you can try using diskpart commands to check and repair errors.

Open the command prompt.

Type “chkdsk /f [drive lerrter]” into the command prompt and press Enter.

Finally, type “exit” and press Enter.


  1. Format hard drive

Some users reported that they successfully solved the I/O device error by formatting their hard drive.


Related: How to Format a Hard Drive with Ease?


Summary

Now, it’s your time to fix the I/O device error? Here, you also can read this post “What Is I/O Device Error?” to find more solutions for this error.


If you have any question or suggestion about “The request could not be performed because of an I/O device error”, please contact us via support@minitool.com.

PC Turns On but No Display

PC turns On but No Display

“My computer powers up all lights, fans, HDD and VGA fan, but nothing comes up on screen…. have checked all connections and monitor… was working fine… then left off for a few months now nothing on screen… any suggestions will help…”


PC turns on but no display! Have you ever encountered the same issue? What should you do when your computer powers up but nothing on the screen?


Don’t worry. Now, this post will tell you how to fix the “PC turns on but no display” issue. If your PC turns on but the screen remains black, you can try the following solutions.


Top Recommendation

If your computer contains massive import data, you’d better recover lost data from it before fixing the “computer powers up but nothing on the screen” issue in case of any accidents.

However, how to recover lost data? Now, you can try using MiniTool Power Data Recovery. Watch the following video to know how to recover lost data.


How to Fix –PC Turns on but No Display


  1. Test monitor.

When your computer starts but screen remains blank, the first thing you should do is to test your monitor and make sure it is working properly.


  1. Make sure your pc has completely restarted.

You should make sure your PC is coming on from a completely powered-off state. You can press the power button down for 3-5 seconds in a power saving mode to power off your computer completely. After completely power off your PC, turn on it and check whether it will boot normally.


  1. Clear the CMOS.

Sometimes, you get the “pc turns on but no display” issue because of the BIOS misconfiguration. In this case, it is recommended to clear the BIOS memory on your motherboard to return the BIOS settings to their factory default levels.


  1. Perform a hard reset.

Performing a hard reset can help to solve the issue “computer starts but the screen is black”.


You need to boot into safe mode and use the System Restore/Automatic Repair to repair Windows.

perform hard reset

Note: if Windows Automatic Repair is not working, you can find solutions from this post: How Do I Solve – Windows Automatic Repair Not Working.


If your sill get thee “PC turns on but no display” issue after performing a hard reset, proceed to the following troubleshooting solution – Restore operating system.


  1. Make A Restore.

Restoring operating system can help to effectively solve many issues including operating system not found, missing operating system, computer starts but screen remains blank…


But, reinstalling OS will delete all data on your original data. Therefore, it is recommended to recover lost data before reinstalling operating system by using a professional file recovery software – MiniTool Power Data Recovery.


However, how to reinstall OS? Here, if you don’t know how to reinstall your operating system to solve the “computer powers up but nothing on the screen” issue, you can find the detailed steps from this post: Detailed Steps and Instructions to Reinstall Windows OS.


Now, it’s your time to fix the “PC turns on but no display” issue. Here, you might be interested in this post “Don’t Panic! 8 Solutions to Fix PC Turns On but No Display”.


External Hard Drive Slow to Open Files

I connect my external hard drive to my PC. However, when I try to open it and access its files, it always takes a long time to open the files. Now, what should we do if you encounter the “external hard drive slow to open files” issue?

Don’t worry! This post shows how to fix the “external hard drive slow to open files” issue.

If you find your external hard drive takes a long time to respond and open files, you can try changing the SATA data cable and changing the USB 2.0 port to USB 3.0 port. If these cannot work, try the following fixes:


  1. Scan your computer for viruses

Running software to scan computer is the first thing you need to do when external hard drive slow to open folders. Get rid of any viruses, malware or other threats are detected by the program.


  1. Check and repair hard drive logic errors and bad sectors.

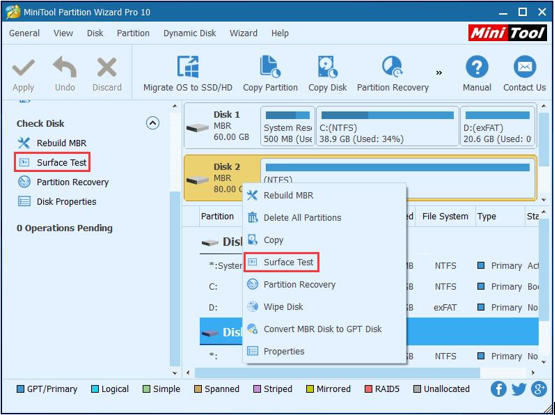
As we know, if your external hard drive has some bad sectors, it will take a long time to respond. Now, you can try using MiniTool Partition Wizard to check whether it has bad sectors.


Launch MiniTool Partition Wizard to open its main interface.

disk surface test

Select the target disk and then click “Surface Test” from the left action panel, or right-click the target disk at first, and then select “Surface Test” from the drop-down menu.

Click “Start Now” button in the new window to start disk surface test.


After scanning, if you find red color, you need to use specific software to shield bad tracks. After that, you can check whether your external hard drive takes long time to respond. If yes, try the following solution.


  1. Export data to another drive.

 If your external hard drive slows to open files, you’d better recover lost data from this drive! However, how to recover lost data since this external hard drive takes long time to recover?

Here, MiniTool Power Data Recovery is a wise choice for you. In general, as long as the data loss is not caused by hardware failure and the lost data have not been overwritten by new data, you can recover them.

Besides, this professional data recovery offers wizard-like interfaces as well as simple operations. Thus, even a new user can easily recover lost data by using this data recovery tool.

Video Watch

Click Play button to learn how to carry out hard drive data recovery.


  1. Perform disk defragmentation to optimize the disk.

 As we know, optimizing drives can help your PC run smoother and boot up faster. Now, you can try the following steps to optimize your drive to solve the “external hard drive slow to open files” issue.


Select the search bar on the taskbar and enter defrag.

Select Defragment and Optimize Drives.

Defragment your Windows

Select the disk drive you want to optimize.

Select the Optimize button.


  1. Place the slow external hard drive a new one.

If all else fails, you might consider that there are some physical problems on your external hard drive. In this case, you have no choice but to find a new drive to replace it to solve the “external hard drive slow to open files” issue.


I hoped this post can help you effectively solve the external hard drive takes long time to open files issue.

Now, tell us which method help you effectively solved the “external hard drive slow to open files” issue.

Should you have any question or suggestions, please contact us via support@minitool.com. We will upgrade this article.

Computer Keeps Freezing

Recently, my computer keeps freezing! Have you received the same error?

Generally, computer keeps freezing is a common problem. I believe that most of us fall across this issue. For instance, a true example from howtogeek.com:

I built my computer a few months ago and now it randomly freezes. Sometimes for 5-10 minutes but other times a hard restart is required. I have disabled some programs from running when the computer boots up such as Skype and that fixed it for about a week but now it is doing it again.

Now, what should we do?
The good news is, it can be fixed…

Now, today, we are going to list some solutions which have successfully helped users solve the “Windows 10 freezes randomly” problem.


Update Drivers
When something goes wrong with your computer or system, the first thing you should do is to update drivers.

Right-click This PC, and then click on Manage, and click on Device Manager.
Open the category that you think contains the device you want to update its drivers.
Right-click the hardware’s name or icon and then choose Update Driver Software…

Update all device drivers to the newest


Free up Disk Space
As we know, once the C drive is full, your computer will keep freezing. Therefore, you have to make sure your C drive have enough space.


Note: What should you do if your C drive is full? Now, you can find answers from this post 3 Ways to Help You Get out of Low Disk Space Warning in Windows 7/8.1/10.


Run System File Checker

Sometimes, if system file is corrupted, you might encounter the Windows 10 keeps freezing issue. Now, you can try the following steps to fix this issue:

Open Command Prompt window (please Run as administrator).
Type sfc /scannow and press Enter button.
After Windows checking and fixing, you need to type exit and press Enter to leave it.

Run System File Checker


Clear Computer’s Temp Files

Computer will slow down or even freeze if it doesn’t have enough space to store temp files. In this case, you can try clearing your temp files.

Press Windows key and R to open the Run box, type temp and click OK.
Select all the files in the Temp folder and delete them.

If your computer still keeps freezing after clearing the temp files, you can try the following fix.


Run Disk Check
If your hard disk has bad sectors, you might encounter the “computer keeps freezing” issue.

Now, fortunately, you can try using MiniTool Partition Wizard to check whether it has bad sectors by using its “Surface Test” feature. Once there are some bad sectors, you had better hide these bad sectors before using it.


What should you do if none of them works? Now, you might try the last solution – restore operating system.


System Restore
Here, if your computer still keeps freezing after trying the above solutions, you can restore your operating system to solve this issue.

Top Recommendation: Restoring operating system will destroy all original data. Therefore, you had better recover lost data before restoring OS, However, how to recover lost data when computer keeps freezing and not responding? Here, you can try using MiniTool Power Data Recovery.

I used this tool to effectively recovered lost data when my computer keeps freezing.


Hope this post can help you.
Should you have any other good suggestions or solutions on how to fix computer keeps freeze, please share it with us.

SD Card Recovery

Accidentally delete files on SD card? Mistakenly format SD card? SD card becomes RAW? Blank SD card…


Have you ever encountered the above issues? How should I do SD card recovery?


Fortunately, MiniTool Power Data Recovery, a professional file recovery software, can help to effectively recover lost data from SD card. Besides, this professional tool offers wizard-like interface as well as simple operations which can help users effectively recover lost data without any difficulty.


MiniTool Solves Different SD Card Data Recovery Situation


With MiniTool Power Data Recovery, you can solve almost all SD card data loss situations as follows:


  1. Recover Deleted Files from SD Card

As we know, human error is the biggest reason for data loss. Users may permanently delete some needed files by mistake.

recover data from sd card

However, as long as the lost data have not been overwritten by new data, you can recover them by using MiniTool Power Data Recovery. For more information, you can read this post How To Recover Deleted Files From SD Card In Easy Way.


  1. Recover Lost Data from Dead SD Card

SD card is widely used to store files in Digital Camera, Phone, etc. However, SD card can be corrupted easily due to users’ improper operations or others’ intentional attacks. As a result, you cannot access its data.


In this case, you can try using MiniTool Power Data Recovery. The best file recovery software can help you effectively and quickly recover data from dead SD card without affecting the original data because it is a read-only tool.


  1. Recover Data from Blank SD Card


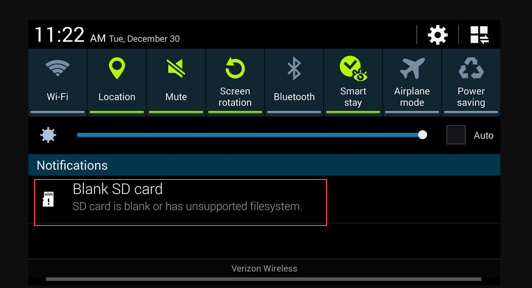
SD card is blank or has unsupported file system? What should you do when you encounter this error message.


blank sd card

Of course, formatting SD card is a good way to solve the blank SD card issue. However, formatting will delete all original data. Therefore, before removing out the “SD card is blank” error, you need to recover lost data from SD card. Otherwise, the original data could be overwritten and there is no way to recover them.


Related: 7 Solutions: SD Card Is Blank or Has Unsupported File System


  1. Recover Data from not Formatted SD Card

You need to format the SD card before you can use it! I guess most of you have encountered this error. However, how to solve this error without affecting the original data.


Generally, experienced users who solved this problem always do the following 2 things.


  • Recover data from not formatted SD card.
  • Format the SD card.

Tip: Here, you can read this post: How To Deal With Micro SD Card Not Formatted Error – Solved to find more detailed information.


  1. Recover Data from Damaged SD Card


Last but not least, most users reported that they have encountered an error message saying ‘this memory card cannot be used, card may be damaged, insert another card’. Now, how to solve this issue?


Click Play button to learn how to fix error “This Memory Card Cannot Be Used” with ease.


Now, it’s your turn to do SD card recovery. If you have any question about how to recover data from SD card by using MiniTool Power Data Recovery, you can contact us via support@minitool.com. Thanks in advance!

Windows 10 Automatically Restarts

Windows 10 automatically restarts? Have you ever encountered this issue? Do you know the reasons for computer randomly restart? How do you fix a computer that keeps restarting?


Why Windows 10 Automatically Restart?

Why is the computer randomly restarting? Generally, there are many reasons which can lead to the automatic restarts problem. For example, hardware failure, system instability, overheating or a faulty power supply, a faulty RAM, a virus or malware issue, driver problems, Windows update, etc.


More seriously, some users cannot find their original data after Windows 10 restarting. In this case, users have to recover lost data via a best file recovery software before fixing the Windows 10 automatically restarts problem.


Click Play button to know how to recover lost data

Now, you might be wondering:
“How to solve the automatic restarts problem?”


How to Fix – Windows 10 Automatically Restarts
If your computer keeps restarting, you can try the following solutions.

Note: before fixing a computer that keeps restarting, you need to check if the computer is overheating, as well as check whether the power issue causes the random restart in Windows 10.


1. Disable the automatic restart option

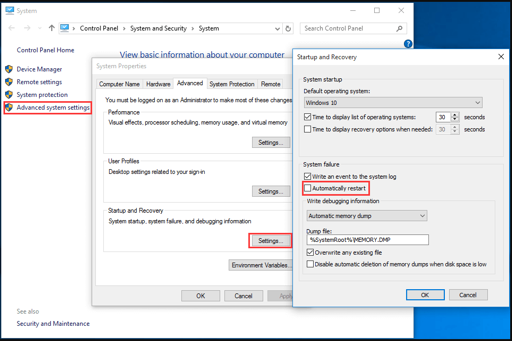
Press Windows + R to open the Run dialog, enter control panel in the empty box and click OK to open Control Panel.

Choose System and Security and then hit System.
Click on Advanced System settings in the pop-up window.
Click the Advanced tab, and then click Settings under the Startup and Recovery section.
Remove the check mark next to Automatically restart under System Failure, and then click OK.

Disable Automatic Restart Feature

Restart the computer.


2. Rename the Reboot File
Open the Run command by pressing the Windows key + R keyboard shortcut.
Type “%windir%\System32\Tasks\Microsoft\Windows\UpdateOrchestrator” and press Enter.
Select the Reboot file without an extension, right-click it, and select Rename.
Rename the Reboot file to Reboot.old.
Right-click on the folder, select New and click on Folder. Then you can rename it.


3. Change Advanced Power Settings
Type power options in the Search box and choose Power Options from the list of results.
Click Change plan settings, and then choose Change advanced power settings.
Scroll down and go to Processor Power Management.
Click Minimum processor state, and specify the value of On battery and Plugged in as 5%.

Change Advanced Power Settings
Click OK to save changes.


4. Check RAM Errors
Type mdsched.exe in the Search box and hit Enter.
Choose Restart now and check for problems (recommended).

Check RAM errors

Windows Memory Diagnostics Tool will begin to test your RAM for errors.
Windows will restart automatically after the checking is completed.
Check the test result. (If you cannot find the results, you can Event Viewer > Windows Logs > System > Find. Type MemoryDiagnostic in the find box and click Find Next.)
Change the faulty RAM if there are some errors. If not, try the following solution.


5. Update the BIOS
Users who are running computer within outdated BIOS will encounter the Windows 10 automatically restart problem. In this case, it is very necessary to update BIOS.
Related: How to Update Your Computer’s BIOS


Bottom Line
Hope this article can help you.
If you have any question about Windows 10 automatically restarts problem, please contact us via support@minitool.com.

Change RAW File System to NTFS

I could not access data saved in my USB drive. I received the following error message when trying to open it.

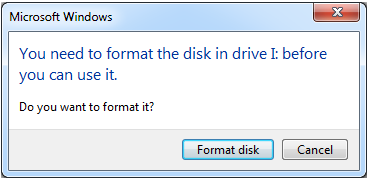
You need to format the disk in Drive I: before you can use it. Do you want to format it?

you

Here, I chose Cancel since formatting will destroy my original data. However, I received another error “The volume does not contain a recognized file system.” Then, I checked my USB drive Disk Management, I found it shows RAW file system. Now, how to change RAW file system to NTFS?


As we know, Windows cannot recognize RAW file system. Thus, if you want to use your USB drive again, you have to convert RAW to NTFS/FAT 32? However, How to fix RAW drive without data loss.


Experienced users who successfully converted RAW file system to NTFS without data loss always do the following 2 things.


  • Recover data from RAW USB drive
  • Format RAW USB drive to NTFS


Now, let’s see the detailed steps.


Part 1. Recover data from RAW drive

When it comes to RAW file system data recovery, you can try using MiniTool Power Data Recovery. Developed by MiniTool Solution Ltd., this professional data recovery software offers 4 different data recovery modules to help you effectively deal with different data loss scenarios.


Now, try the following steps to recover data from RAW drive.


Step 1. Connect your USB drive to PC. Download and install MiniTool Power Data Recovery.


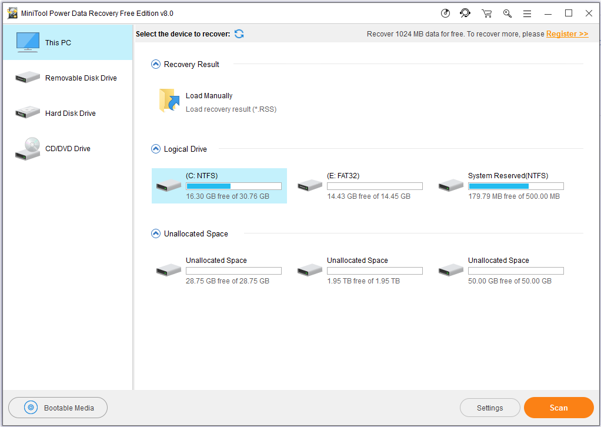
Step 2. Launch MiniTool Power Data Recovery, and then select Removable Disk Drive to recover data from RAW USB drive.

the main interface of PDR FREE

In the main interface, you can see 4 different data recovery modules including This PC (default data recovery module), Removable Disk Drive, Hard Disk Drive, and CD/DVD Drive. Here, you can choose Removable Disk Drive to recover data from USB.


Step 3. Select USB drive and click Scan button. Please wait for the full scan finishes to get the best recovery result.


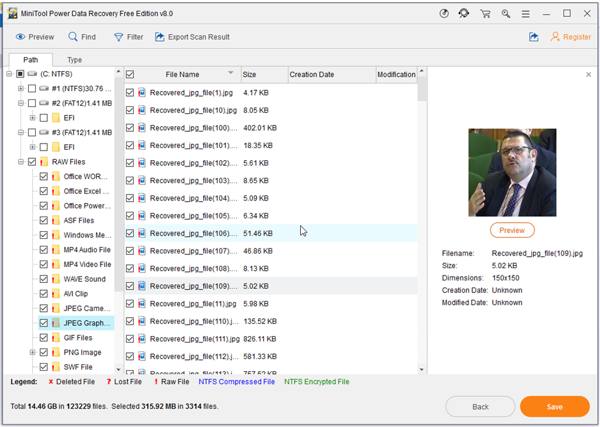
Step 4. Check all needed files, and click Save button to store them.

pdr free save


Video Watch


See! With MiniTool Power Data Recovery, you can effectively and quickly recover lost data from RAW file system. Of course, this professional data recovery software can also perfectly solve other data issues. For instance, it even can recover data when PC won’t boot.

With Data Recovery, let’s see how to convert RAW drive to NTFS.


Part 2. Change RAW file system to NTFS

To fix RAW drive, you can try formatting your USB drive to NTFS or FAT 32 file system.

The steps are:

Open File Explorer.

Right-click the USB drive, and then choose Format partition.

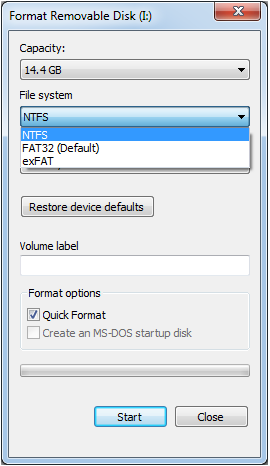
Specify file system, volume label and check the Quick Format.

Click Start to change RAW file system to NTFS.

format

More ways to format drive can be found in this post: How to format hard drive with ease?


Now, it’s your turn to fix RAW drive.

Should you have any questions or suggestions on how to change RAW file system to NTFS without data loss, please share it with us by sending email to support@minitool.com so we can update this article!